The Insert dialog of the editor toolbar is used to add images or files to an article.
4.1.1 Drag-and-drop method
While you are editing an article, you can drop an image as a thumbnail onto the page. This generates a new file name (which can be changed during upload):
- Drag the file onto the page. A horizontal line will appear where the file will be dropped.
- Change the file name in the Upload file dialog (optional).
- Click Insert.
- Double-click the thumbnail to adjust the size and positioning (optional).

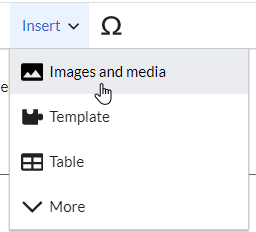
4.1.2 Editor toolbar
To upload an image file using the multi-step Insert-dialog of the editor toolbar:
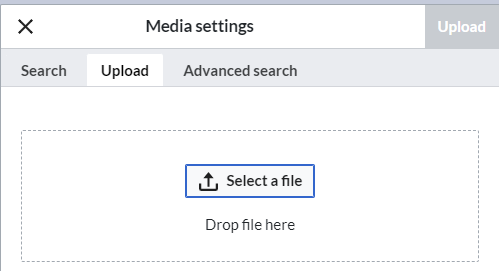
- Click Insert > Images and media in the editor toolbar.
- Select a file to upload or drag it into the upload area.
- Click Upload. The dialog box Media Settings opens.
- Add the settings details for your file:
- Target namespace: If you associate the file with a namespace, it can be targeted in queries. The file also inherits the access rights of the namespace.
- Name: Choose a search-friendly name for your file.
- Description: The description is mainly useful for photos or infographics when the image name does not adequately describe the image content. It will be used for the full-text search.
- Categories: The image will appear on any associated category pages.
- Click Save.

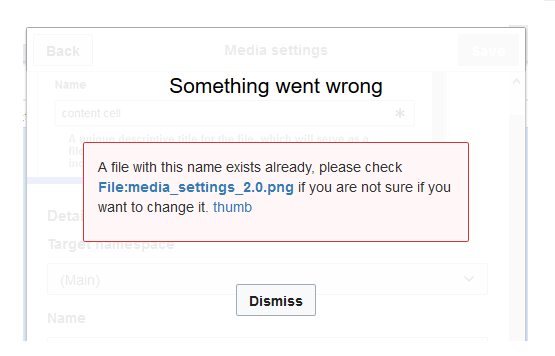
Error message when saving: If the image already exists, an error message is displayed. If you want to overwrite the existing file, you can click on the file name and overwrite the file via the image page in the wiki. This is done by clicking the "Upload a new version of this file" link in the "File Versions" section. In VisualEditor itself overwriting an image does not not work.
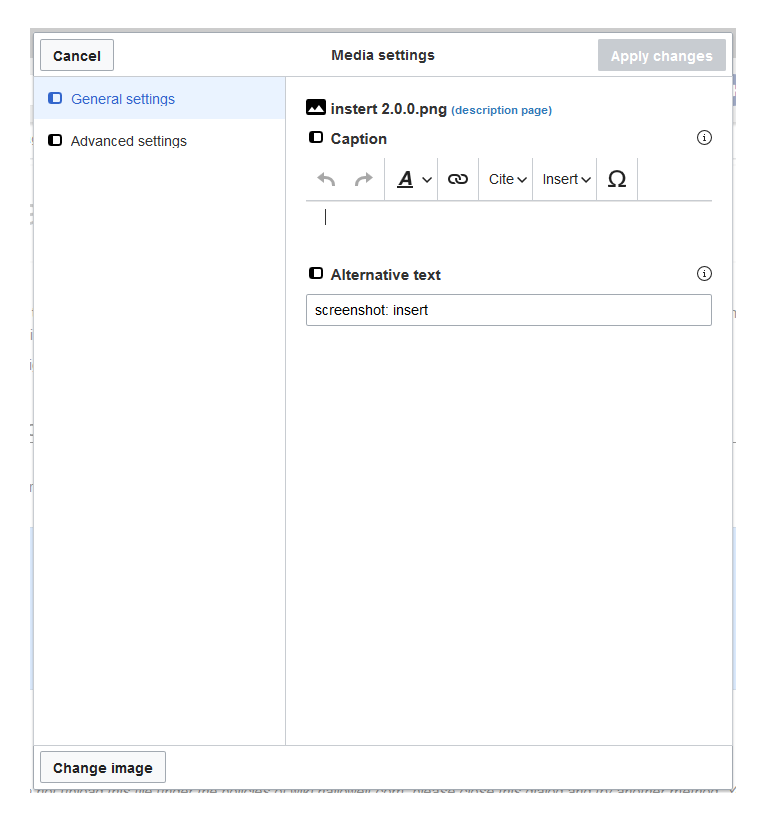
4.1.2.1 General settings
In the general settings, add a caption and an alternative text:
- Caption: The caption is shown with images of type "thumbnail" or "framed". Note: If you change an image to "frameless" and then back to "framed", you need to re-enter the caption.
- Alternate text: The alternate text should be entered for each image since it represents the image for users who cannot see the image. This so-called "alt"-text is used by users who work with screen readers or by search engines. In some business areas, the "alt"-text is also required by law.
4.1.2.2 Advanced settings
In the advanced settings, you can set the position and image size.
The following settings are possible:
- Position:
- Wrap text around this item:
- Left: The image is displayed on the left side of the text, starting on the first line of the current paragraph.
- Center: The image is displayed centered over the current paragraph.
- Right: The image is displayed to the right of the text, starting on the first line of the current paragraph.
- Wrap text around this item:
- Image type: If you insert an image with VisualEditor, the image is usually linked to the Media Viewer. To suppress the link on an image, you must add an empty link attribute to the image tag in the source code:
- frameless picture with link (standard):
[[File:adult-chair-company-380769.jpg|frameless]] - frameless picture without link:
[[File:adult-chair-company-380769.jpg|frameless|link=]]
- frameless picture with link (standard):

| Image type | Output | Description |
|---|---|---|
| Thumbnail | The preview picture shows the image with a standard width of 300px. The width can be adjusted as required.
| |
| Frameless |  |
The frameless version shows the picture without a frame. The width can be adjusted as required (here we set the example to 300px).
The caption does not appear below the picture. By default, the image is inserted without text wrapping. It will break up a sentence exactly where it is inserted. By default, the image is centered. However, the image size and position can be adjusted as needed. |
| Frame | This is the caption |
The framed version is similar to the preview picture. Compared to the preview, the magnifying glass symbol is not displayed and the image is inserted on the page full-size.
The size cannot be adjusted. |
| Basic |
|
The basic version is like the frameless version.
By default, text does not wrap, but the text is separated at the point where the image was inserted. The image is inserted in full width, while the frameless image is inserted in miniature image width (300px). The size can be adjusted. |
- Image size:
- Standard: sets the image width to 300px (unless the standard width has been changed in the user preferences).
- Custom: allows setting a custom size.
- Make full size: resets the size to the actual image size.
4.1.3 Embedding versus linking a file
If you select a non-image file (such as pdf or docx), you will see a slightly different media settings dialog:

There are three ways to link a file on a page:
- Link this file (1): The link will open the file directly. It wil be downloaded if it cannot be opened in the browser.
- Link file description page (2): The link leads to the file page on the wiki. There, you can view the file details or upload a new version of the file.
- Embed this file (3): The link inserts a preview image. The preview image opens the file description page when clicked. This only works with PDF and .tiff files. For files like .docx or .xlsx, a link to the description page (identical to option 2) is created.
4.1.4 Limitations
The maximum allowed file size cannot be configured in the wiki itself. The maximum allowed limit is defined on the server in the php.ini file in the PHP installation. The actual (possibly smaller) limit, however, is set in the BlueSpice installation in LocalSettings.php or another configuration file in the settings.d folder. The default setting is 32 MB.
Contact your wiki administrator if you receive an error message when trying to upload a larger file.
4.1.5 Changing an image on a page
- Different image: In the editing mode of the page, it is possible to edit the image with a double-click. Use the "Change image" button to exchange the image with a different image.
- Same image with different version: If you want to use a new version of the same image, open the "Special:Upload file" page in a new browser tab (so that you don't lose any changes on your wiki page). There, you can save already existing pictures with the same name again. The original image is kept as a version.